Hydro dipping is a fun and easy way to customize any item as long as it can withstand being “dipped” into water. This can range from personal belongings such as your shoes and water bottles to home decor like the stones in your yard.
In the past, it used to be a craft left for professionals, but nowadays, it’s within the domain of any DIYer. Thanks to the emergence of spray paint, all you need is a little craftiness.
So, what is the best spray paint for hydro dipping?
After much research, testing, and reviewing customer feedback, we’ve compiled a list of the ten best spray paint to use for hydro dipping.
The products listed here will help you create long-lasting, beautiful color splashes and patterns on objects.
Can You Use Spray Paint for Hydro Dipping?
Yes, you can. Spray paint is arguably the most popular technique, especially among newbies, and is highly recommended if you want something that is easy to handle and control.
It helps to create lean layers of paint, and since you’re not dropping the paint directly over the water, it’s easier to achieve consistent layering.
In addition to providing great control, using acrylic spray paint will help you achieve a marbled effect.
Not all spray paints are suitable for hydro dipping, some cans are easier to use, while some offer better colors and finishes. They also vary in composition and price, as well as stickability.
You will find that most adhere to all surfaces, while some spray paint will only stick to certain materials.
So, before hydro-dipping, any object, make sure the surface texture can absorb the color and pattern you have chosen. This will enable you to create all kinds of psychedelic designs.
It’s worth mentioning that you should never use water-based spray paint for hydro dipping. This is because they don’t float well.
How Does Hydro Dipping Work?
This is a type of paint application that allows you to transfer color or graphics from the surface of water onto an object by dipping the object into the water. In this case, you apply paint on the surface of the water to create a film of paint.
Then, dip the item you wish to customize into the water to absorb the paint. This often results in a marbling or psychedelic effect.
The process can be used to customize almost any item ranging from automotive parts such as wheel rims to household items like tumblers, shoes, and even firearms.
The main idea behind hydro dipping is surface tension. Here, the liquid (water plus paint) acts like a stretched elastic membrane. The surface tension holds the paint particles against the surface of the object that is submerged until they fill the entire area that is dipped.
An interesting fact about hydro-dipping is that no two items can have exactly the same pattern or design, even if they are hydro-dipped with the same color(s).
What Material Can You Hydro Dip?
You can hydro any material as long as it’s something you can submerge in water. If you can paint it using traditional techniques, chances are that you can hydro dip it too. These include but are not limited to plastic, metal, ceramic, rubber, paper, glass, fiberglass, and other materials.
Other things to consider when hydro dipping any item are the size, content, and waterproofness. The object should be waterproof and small enough to fit into the bucket of water. Also, it shouldn’t have any electronic components.
Common items around the home that are often hydro-dipped include shoes, guitars, helmets, socks, bottles, consoles, skateboards, game controllers, car wheels, and even guns. Flat and three-dimensional surfaces can also be hydro dripped.
What Kind of Paint Can You Use For Hydro Dripping?
Either acrylic or oil-based spray paint can be used for hydro dripping.
Most people prefer acrylic one because it offers more coverage than oil-based ones. It is also easy to thin (if you’re using regular paint) and creates a marbled finish.
A unique property of acrylic is that it floats to the top of the water as a lean film and will easily stick to the object that is submerged.
Oil-based paints, on the other hand, offer more vibrant colors and are water-resistant.
In general, the best color for hydro dipping depends on the object. Acrylic paint is better for three-dimensional objects such as plastic, and metal. It adheres better to the surface and allows you to fill the space with many different colors and designs.
In contrast, oil-based paints do not work well for three-dimensional objects. And that is because they are much heavier than acrylic paints, which means they won’t be able to create the lean film on the water surface.
Instead, you should use oil-based paints for hydro-dipping flat surfaces such as paper or canvas. These paints tend to give a glossier finish and also allow you to create a marbled effect.
How Do You Hydro Dip With Spray Paint?
Prepare the Surface
Before you dip anything, you want to give the object a thorough cleaning. This is important to ensure the paint stick well on it. Depending on the material, you may need to sand it to remove previous coatings or to provide a smooth surface for the paint to adhere to.
After prepping the material, spray a thin layer of primer or base coat and leave it to dry for 1 to 3 hours. We recommend using something translucent. Also, ensure you tape over any section of the object you don’t want the paint to get to.
Prepare the Water-bath
Start Spraying
Next, fill a container with warm water up to a depth of about ¾. You want to be able to completely submerge the object without getting to the bottom.
Any large, deep container will do – big rectangular plastic containers or buckets are great. Ideally, it should be something you wouldn’t mind disposing of when you’re done.
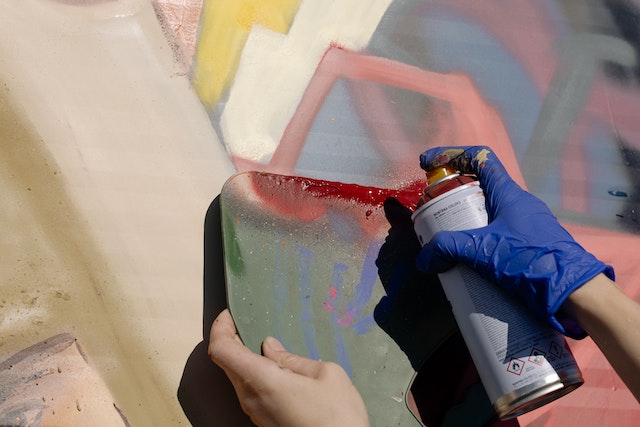
Before you spray, ensure you’ve worn your mask and gloves. Also, choose a well-ventilated area, such as your backyard.
Now, you can spray the colors onto the surface of the water. You can either do one color, or you can do multiple colors. For the best outcome, it’s recommended to combine colors next to each other.
While spraying, make sure the paint layers are thick enough to coat the object you’re dipping. However, it’s worth noting that the thicker the layer, the longer the drying time.
Dip the Object
Now, on to the most important part – dipping the object. For this step, you want to be gentle and slow so you can get the object covered adequately.
Slowly dip the object into the water until it’s completely submerged. Then take it out again at the same angle and speed.
NB: To ruin the design, we advise removing paint from the water surface before pulling out the item. Alternatively, you can create an area of non-painted water by disturbing the surface. Removing the item while the paint still remains on the water causes the paint to stick to it.
Add Finishing Touches
Remove the item and allow it to dry completely. This can take a few hours. After that, you might want to add a clear coat or polyurethane to further protect the piece. Apply 2-3 coats and allow complete drying time between each coat.
Voila! Your work is ready for everyone to admire!
Best Spray Paint For Hydro Dipping
1. Rust-Oleum 249113 Painter’s Touch 2X Ultra Cover
The Rust-Oleum Painter’s Touch 2X is equipped with Double Cover Technology, which provides increased application speed. This enables you to cover the surface quickly without sacrificing quality. The paint goes on smoothly, leaving behind a gloss finish that looks both fresh and attractive.
Almost any surface indoors or outdoors can be watermarbled using this paint. It is available in multiple vibrant colors and provides good coverage. Specifically, each aerosol can cover up to 12 square feet.
Even though it’s oil-based, it dries much faster than regular options. It dries to touch in about 20 minutes and repels water once fully cured.
Surprisingly, the paint is low odor and doesn’t chip or scratch easily. However, we still recommend wearing your gloves and a mask.
We also found it easy to use, especially for beginners. It features a comfort spray tip with a wide finger pad that helps to reduce finger fatigue. Before applying the paint, shake the can for at least one minute. Continue to shake it often while using the paint. This helps to create a uniform finish.
Also, don’t spray too close to the surface or while applying the base coat. Hold the can 10 to 16 inches away and spray back and forth. If the valve gets clogged, remove the tip and clean it with mineral spirits.
Apply caution when handling the spray can. You don’t want to drop it carelessly; otherwise, it will break. The nozzle might pop off, and the outlet tube might break. Many customers have already complained about this.
Overall, we are impressed with the quality of the paint color. It is ideal for creating hydrographic designs and patterns and will adhere to almost anything while providing a durable finish and excellent hide.
What We Liked ????
Provides long-lasting protection and excellent hide
Provides a beautiful, even finish
No dripping
Convenient any angle spray
Goes on smoothly
Works for different surfaces
Available in a variety of colors
What Could Get Better ????
A bit overpriced
Spray can is not too strong; could break when dropped
2. Rust-Oleum 327874 American Accents Spray Paint
The Rust-Oleum American Accents is another spray paint that provides superior coverage, making it easier to complete your project faster. Like the previous product, it covers up to 12 square feet per can. Although it’s mostly regarded as a general-purpose paint, it’s an excellent choice for this kind of project.
It comes in several vibrant colors and sheens, which allows you to create unique swirly patterns. To be more specific, there are over 80 color variations to choose from, as well as various sheens, including satin, matte and gloss finishes.
It works on most surfaces, including metal, wood, plastic, and vinyl. It is consistent and doesn’t dry on the water before you’ve had the chance to dip the object. And once you take out the object, it doesn’t take long to dry.
Generally, the paint dries to touch in 20 minutes and covers up to 12 square feet leaving behind a vivid color. Project time is usually longer when hydro dipping.
You have to be careful when handling the can to avoid getting an uneven finish. Don’t keep it too close to the water, and avoid spraying too much, or it may come out wrinkly.
For general applications, do two or more coats for even coverage and better protection.
It is all-inclusive, which means you can use it without applying a primer or topcoat. But we advise applying those so you can get better adhesion and protection, respectively. You can also use a top coat, ideally from Rust-Oleum. This will make the paint more durable and resistant to chipping, though it will come at an extra cost. Make sure the paint cures fully before applying the topcoat or clear coat.
Make sure the wear your gloves and a mask while painting.
What We Liked ????
Superior durability
Suitable for different surfaces
Great coverage
Robust adhesive quality
Provides a fresh shine and long-lasting protection
What Could Get Better ????
A few customers complained about a defective nozzle
3. Rust-Oleum 277239 Stops Rust Spray Paint
As the name suggests, the Rust-Oleum Stops Rust Protective Enamel Paint is arguably the most protective spray paint on the market. It is specially formulated to protect surfaces from rust and weather damage. It is also resistant to chipping, peeling, cracking, and fading. This makes it perfect for protecting items handled often or exposed to the elements.
For hydro dipping, it works best for alloy, metal, and wood. You can use it with other spray paints like the ones mentioned above.
The oil-enamel-based formula provides a glass-like shine and gives it a smooth, sleek texture. There are up to 77 colors to choose from. Each color is vibrant and delivers an excellent shine. The can is 12 ounces, while coverage is up to 15 square feet.
The paint dries to touch in 2 to 4 hours, depending on the weather condition.
In terms of comfort, the aerosol can comes with a spray tip with a wide finger pad that makes it easier to spray for a long time without finger fatigue. It also offers Any Angle Spray for hard-to-reach areas. You can even hold the can upside down.
Like most oil-based paints, Rust-Oleum Stops Rust Stops Rust paint has an odor. So, it’s recommended to spray outside. Also, wear a respiratory mask to protect your lungs from harmful fumes.
Overall, if you’re looking for a good flat paint with reliable color quality, you will not go wrong with the Rust-Oleum Stops Rust. When used for hydro dipping, it doesn’t only provide a bold appearance but also promises to last for a long time.
What We Liked ????
Resistant to fading and chipping
Best for metal surfaces
Any Angle Spray for tight corners
Comes with a wide spray tip for your comfort
Comes in a variety of colors
Decent coverage
What Could Get Better ????
Long drying time compared to other options
4. Dupli-Color DE1613 Engine And Ceramic Paint
When it comes to hydro dipping automotive parts, you can’t go wrong with Dupli-Color. It’s easily the best paint for engine enamel and ceramic.
It contains ceramic resins that offer protection from exposure to excessive heat and automotive fluid, making it an excellent choice for touching up auto parts under the hood. Specifically, it can resist high temperatures up to 500 degrees Fahrenheit, so it’s perfect for the most rigorous application such as car racing, restoration, and street rod. This means you can pop it right into the oven and bake at 350 to 400 degrees for quick drying. The longer you bake it, the harder and tougher the paint will be.
In addition to its high heat resistance, it produces a nice not-overly-glossy finish that doesn’t crack, peel, or flake and looks good on auto parts. Simply put, the paint dries to a candy-color, hard shell, capable of repelling fluids and dirt and enduring high temperatures.
You also get good thick coverage that feels like baked-on paint. To get the best results, we recommend priming the surface first. Also, take the time to clean it; remove all dirt and grease with warm soapy water and a sponge. For more thorough cleaning, you can wipe further with isopropyl alcohol and then wash again with soap and water.
Sanding may be necessary, depending on the material. Don’t skip the prep work, or you may not be satisfied with the final outcome. Like regular paint jobs, hydro-dipped items can also flake if the surface underneath the paint is dirty.
In terms of application, the “rattle” can is very easy to use, and the nozzle gives a nice spray pattern. Remember to shake it before use and every 20 to 30 seconds while using it.
What We Liked ????
Superior heat protection
Dries fast and provides great coverage
Nice color quality
Perfect for under-the-hood applications
Highly durable and long-lasting
What Could Improve ????
Has strong fumes (we recommend painting outdoors)
5. Rust-Oleum Pure Gold 245221 Universal All Surface Spray Paint
The Rust-Oleum Universal All Surface Spray Paint is very similar to the Painter’s Touch. The main difference is the color. As the name implies, this is metallic color, which makes it a great way to upgrade your metal fixtures.
It is oil-based, so it can be used for hydro dipping. Even though it looks nice on metal, it also adheres well to other surfaces, including plastic, wood, vinyl, and fiberglass. It provides rust protection for metal pieces and also resists chipping and fading.
We found the aerosol can very easy to use. It comes out smooth and evenly without any drips, bubbles, or crackles. A few customers complained about the nozzle getting clogged or splitting blobs of paint. But this can be avoided by wiping off the nozzle with a rag after each use.
The paint dries to the touch in 30 minutes. It may take longer, depending on how favorable the weather is. Make sure to follow the instructions carefully!
To get good coverage, spray the paint close to the water and disturb the surface to get un-painted water when taking out the first dip. For regular painting projects, it’s recommended to do 2 to 3 light coats, but for hydro dipping, you don’t need to dip it a second time if you don’t want to. Once you’re satisfied with the pattern or design, you can apply a clear coat for additional protection.
Ensure there’s proper ventilation when working with the paint as it is toxic and has strong smell. Wear a mask and gloves too. It’s best to work outside the house but if you’re using a room, make sure the door and windows are open. Also, keep the fan on for faster dissipation of the painting.
Overall, we are impressed with the quality of this paint. It’s one of the more popular oil-based formulas with excellent adhesion and a beautiful realistic metallic finish. Though some people consider it a bit pricey, we think it’s worth every penny.
What We Liked ????
Attractive, shimmering metallic finish
Long-lasting protection
Reliable quality
Enhanced durability with rust protection
Coverage is good
Easy to use and doesn’t drip)
What Could Improve ????
A bit pricey
6. Krylon K05160107 ColorMaster Paint + Primer
The Krylon ColorMaster is one of the best fast-drying spray paints you will find out there. It is specially designed for automotive applications but can also be used on most surfaces. So, if you have a metal object or some other material that needs hydro dipping, Krylon ColorMaster is your best bet.
Thanks to its durable Covermax Technology, Krylon ColorMaster provides superior coverage and adheres nicely. It covers with just one or two coats (depending on what you’re painting) and distributes evenly.
Since it has a primer, you can skip the primer step and save more time and money.
Although the spray cap on the can is a bit smaller than we expected, it’s still easy to use. It’s perfect for people with small to medium fingers and makes it easy to direct the paint. It doesn’t run or splatter except for user error.
As earlier indicated, Krylon ColorMaster is fast-drying. Specifically, it dries in 10 minutes or less and can be handled after an hour. This allows you to apply multiple coats very quickly.
Make sure to wait the full amount of time between coats, even if it takes more time to dry to touch. Factors such as temperature, humidity, and type of material can affect the drying time. Don’t be in a hurry!
It doesn’t smell too bad but is still noticeable and can linger for days if there’s no good ventilation. This can be a problem if you’re sensitive. The best way to prevent this is to take the project outside and leave it there for a while after painting. Otherwise, if you’re painting indoors, ensure there’s proper ventilation.
What We Liked ????
Rich solid color
Great coverage and adhesion
Easy to use
Fast-drying
Suitable for interior and exterior surfaces
Reliable quality
What Could Improve ????
A little pricey
7. Southern Hydrographics All Surface Primer
The Southern Hydrographic All Surface Primer is the only product on the list that is specifically formulated for hydro dipping applications. It is suitable for other types of hydro dipping, not just the spray paint method. So, it also works well for hydrographic film and water transfer printing.
One of the challenges with using water for hydrographic projects or water transfer printing is that the paint can become too runny in “mixing” with the water. This usually happens when you use the wrong type of paint.
With this hydro film dip paint, you won’t encounter such problem. This is because it clings well to the surface you apply it to – thanks to its stickability. It doesn’t only hold color but also ensures the paint doesn’t appear too filmy.
The product comes in a 16-ounce aerosol can, which is the highest on the list. So, the coverage is on the high side. This means that no color layered on top will become sheer or streaky.
The primer also dries fast, so you don’t need to wait long between prep and painting. You can sand objects for better adhesion.
Overall, choose this primer if you want a seamless start for your art. It is very forgiving and comes in handy, making it perfect for first-timers. Make sure to follow the instructions on the label.
What We Liked ????
Good adhesion
Fast-drying formula
Ensures there is no bleeding through the surface
Sandable
Ideal for hydro dipping
What Could Improve ????
Few customers complained of a defective nozzle
8. Rust-Oleum 1915830 Specialty Metallic Leafing Spray Paint
If you have any overused gold item that needs a change, the Rust-Oleum Specialty Metallic Spray Paint comes highly recommended. It is our go-to spray for metallic coverage, especially if you prefer a gold or silver finish. It is also available in brass and copper shades.
It is designed for use in interior items, especially your home decor and accent pieces. Regardless of the color you choose, it adds a rich, shiny finish that stands out in any space.
Rust-Oleum Specialty Metallic Spray Paint perfect for hydro-dipping metal pieces, but you can also use it for wood, rubber, masonry, and even unglazed ceramic. It adheres perfectly and leaves an overall even sheen.
Basically, any item that could use a shiny touch-up is a candidate. The paint contains real metal leafing flakes, which is responsible for its super shiny, reflective finish.
Our favorite is the silver color; gold comes second. Both colors are simply incredible, especially when used on metal, ceramic, wood, wicker, etc. Each color comes out as a nice metallic finish with a nice sheen, not a mirrored finish.
Another thing we like about the paint is that it dries quickly. It dries to touch in 15 minutes and recoat within an hour. You may need to wait longer depending on temperature and humidity levels and what you’re hydro dipping. Remember to shake the can for 2 minutes before spraying. Once you’re done, allow the object to dry in a well-ventilated area, preferably outside or in your garage. This may take a few hours.
It also provides very good coverage. It’s best to prime the product before you dip. Light sanding might also be necessary. Allow the dripped object to dry fully before handling.
Overall, we recommend this paint to create the appearance of new precious metal on any item. It has one of the wider triggers and dries super fast with no drips. It is probably the best metallic paint you will find out there!
What We Liked ????
Beautiful reflective metallic finish
Very smooth application
Decent coverage
Fast-drying
Easy to use
What Could Improve ????
Shine may not last very long
How To Choose The Best Spray For Hydro Dipping
With so many brands in the market, choosing the best spray paint for hydro dipping can be a bit tricky. To make things easier, we’ve put together these points to help you make an informed decision.
Color
There are different aspects of the spray color to consider when selecting a product – vibrancy, quality, and variation.
Most brands offer a variety of color palettes, making it easier to find something that suits your preference. You will also find various shades of colors that look very similar.
Another thing to look at is the color quality. Some colors fade easily, which is usually an indication that the quality is poor. Such paints tend to be inconsistent and are usually too thick or too runny. They will often produce globs or droops when applied to a surface.
Finish & Sheen
Another thing you should decide on is the type of finish and sheen you want. Spray paint comes in various finishes, which are meant to influence the final results. Popular options include satin, matte, and gloss finishes. You can choose from any of these depending on the type of look you want to achieve.
Choose a flat finish if you want to hide surface imperfections. Choose gloss or semi-gloss if you want a lustrous finish. Satin is neither too shiny nor too flat and is perfect for objects that are handled a lot.
Drying Time
Generally, spray paints are fast-drying, especially when compared to regular paints. However, the exact drying time usually varies depending on the type of paint and weather conditions.
Water-based spray paints generally dry faster, but there are some oil-based paints that also perform well. Depending on the nature of your project, you will want to choose a product with a short dry time; such paints are ideal for hydro painting and ensure the item doesn’t take days to cure.
How Much Spray Paint Do I Need To Hydro Dip?
There’s no exact amount of this type of paint needed for hydro dipping. What you need depends on the look you desire and the patterns you wish to achieve. You can use just one color or many different colors. In most cases, two or three cans will do, depending on the size and what you’re painting.
Make sure the paint is gloss. You can add a topcoat or waterproofing finish.
Besides regular spray paint, there are many basic home hydro dipping kits you can consider. These kits typically consist of a topcoat, sealant, base coat, and the colors.
You can also hydro drip without spray paint and still get your desired finish by using nail polish, paper marbling, or 3D marbling.

How Long Should Spray Paint Dry Before Hydro Dipping?
This depends on the type of paint as well as temperature and humidity levels. Generally, most spray paint takes about 30 minutes to an hour to dry on a regular day. Sometimes, you may need to wait up to 2/3 hours. Once the base coat is completely dry, you can start hydro dipping. Try hydro dipping the object within 8 hours of spraying!
Tips For Hydro Dipping With Spray Paint
When spraying, direct the spray cans (nozzle) on the water. Ideally, you want to spray in a well-ventilated area such as your backyard.
The container or bucket size should be such that it can envelop the object to be hydro dipped. Fill the container with water to about ¾.
Each coat of paint should be thick enough to cover the object. But don’t overdo it, or the drying time will be longer.
For items that don’t appear sufficiently grippy, you can lightly sand them down with sanding paper or block before hydro dipping.
Make sure the base coat or primer is completely dry before hydro dipping. This might take anywhere from 30 minutes to a few hours, depending on the condition of the weather.
When dipping the object in water, go slowly. Also, before taking it out, remove any paint left on the surface.
FAQS – Best Spray Paint for Hydro Dipping
Do You Need a Base Coat For Hydro Dipping?
It’s generally recommended to use a base coat when hydro dipping. The base coat and primer serve as the bridge between the surface and the hydrographic film. The color you choose for the base coat will determine the final pattern and overall look of the object.
Do You Need Special Spray Paint For Hydro Dipping?
No, you don’t need special spray paint for hydro dipping. Any regular spray paint will work as long as it can give you the color splash and pattern you desire.
Can You Hydro Dip Without Spray Paint?
Yes, you can. Besides using spray paint, there are other ways to hydro dip depending on the material. Two common options are acrylic marbling and using nail polish. Hydro dipping without spray paint creates less mess and less fumes, and you don’t have to worry about wearing gloves or a respiratory mask. However, you may not achieve the same level of color adherence or vibrancy using other methods.
Is Rust Oleum Good For Hydro Dipping?
Yes, it is! Rust-Oleum arguably offers the best selection of spray paints for hydro dipping. These include colors under gloss, semi-gloss, and high gloss finishes.
Does Hydro Dipping Scratch Easily?
Hydro-dipped or hydrographic finishes are usually very robust and durable and do not scratch easily under normal use. Scratches occur when you subject the product to abuse. When this happens, the paint (protective layer) can fail.
Do You Use Hot or Cold Water When Hydro Dipping With Spray Paint?
It’s best to use warm water. For optimal results, the temperature should be 70 to 80 degrees Fahrenheit. This ensures the paint film is applied smoothly and adheres to the surface permanently. Using cold water causes the paint to look dull and blurred. Likewise, if the water is too hot, the object can melt, especially if it’s plastic.
Why Is My Hydro Dip Clumping?
It usually clumps when the object is lowered too quickly through the painted water. This causes the paint to break apart instead of pulling towards the object.
Does Hydro Dipping Last Forever?
Nothing lasts forever! However, hydrographic finishes typically have a long lifespan when done correctly. The timing really depends on the type of paint and how the item is used. Under normal use, they can last 5 to 15 years. But under abusive conditions, the paint can get scratched and fail.
Summary – Best Spray Paint For Hydro Dipping
There you have it – the best spray paint for hydro dipping. If you’ve made it up to this point, you should have picked a product. All the items reviewed here are not only popular but also offer the best professional finish for DIY hydro dipping. In selecting them, we focused on factors such as coverage, durability, and adhesion.
Having said that, choosing the best paint is not enough. The hydro-dipping process will also have a huge impact on the outcome. It may take some practice, especially if you’ve never painted before. Follow the steps and tips above to make things easier.
Remember to protect your skin and lungs by wearing gloves and a respiratory mask.